'elasticsearch'에 해당되는 글 420건

  1. 2020.09.10 [Elasticsearch] Dynamic Templates 간단 정리
  2. 2020.09.10 [Elasticsearch+Docker] 로컬 클러스터 구성 시 흔한 실수.
  3. 2020.09.03 [Elasticsearch] API Key (중복)
  4. 2020.08.31 [Elastic] IaC 기반의 Cluster 관리
  5. 2020.08.26 [Elastic] Elastic Agent 테스트.
  6. 2020.08.14 [Ansible] Elasticsearch + Docker Compose 구성 시 vm.max_map_count 이슈.
  7. 2020.06.19 [Elasticsearch] X-pack Security API Key 사용 해 보기
  8. 2020.06.17 [Elasticsearch] script 사용 시 "#! Deprecation: Deprecated field [inline] used, expected [source] instead"
  9. 2020.06.03 [Filebeat] template 설정 setup.template.append_fields
  10. 2020.05.27 [Elasticsearch]7.x breaking changes.

[Elasticsearch] Dynamic Templates 간단 정리

Elastic/Elasticsearch 2020. 9. 10. 12:18

Elasticsearch Reference 를 그대로 의역한 수준 이라고 보시면 될것 같습니다.


[참고문서]

www.elastic.co/guide/en/elasticsearch/reference/current/dynamic-templates.html

www.elastic.co/guide/en/elasticsearch/reference/current/dynamic-field-mapping.html


match_mapping_type)
JSON 파서를 통해서 data type 을 detection 합니다.
long, double 의 경우 integer 와 float 에 대한 정확한 detection 이 어렵기 때문에 항상 long 과 double 로 detection 하게 됩니다.

detection type 은 아래와 같습니다.
- boolean
- date
- double
- long
- object
- string

[Code Snippet from Elastic]
- long type 으로 matching 된 것을 모두 integer 로 설정 하는 것과
- string type 으로 matching 된 것을 모두 text 와 fields 설정을 이용해서 keyword 로 설정 하는 것입니다.

PUT my-index-000001
{
  "mappings": {
    "dynamic_templates": [
      {
        "integers": {
          "match_mapping_type": "long",
          "mapping": {
            "type": "integer"
          }
        }
      },
      {
        "strings": {
          "match_mapping_type": "string",
          "mapping": {
            "type": "text",
            "fields": {
              "raw": {
                "type":  "keyword",
                "ignore_above": 256
              }
            }
          }
        }
      }
    ]
  }
}


match and unmatch)
이 설정은 field명에 대한 패턴 매칭을 이용해서 data type 을 detection 합니다.
unmatch 패턴은 제외 시키기 위한 설정 이라고 생각 하면 됩니다.

[Code Snippet from Elastic]
- data type 이 string 으로 매칭 된 경우 필드명을 통해 최종 설정을 하는 것입니다.
- 필드명을 통해서 data type 을 설정 하는 것입니다.

PUT my-index-000001
{
  "mappings": {
    "dynamic_templates": [
      {
        "longs_as_strings": {
          "match_mapping_type": "string",
          "match":   "long_*",
          "unmatch": "*_text",
          "mapping": {
            "type": "long"
          }
        }
      }
    ]
  }
}


match_pattern)
이 설정은 위에서 "match":   "long_*" 과 같은 wildcard 패턴을 java 정규식으로 사용하기 위한 설정입니다.

[Code Snippet from Elastic]

  "match_pattern": "regex",
  "match": "^profit_\d+$"


path_match and path_unmatch)
이 설정은 nested 나 object field 에 대한 match, unmatch 와 동일한 설정 입니다.

% Nested field type
The nested type is a specialised version of the object data type 
that allows arrays of objects to be indexed in a way 
that they can be queried independently of each other.

{name} and {dynamic_type}
이 설정은 field명을 {name} 으로 사용하고 matching 된 data type 을 {dynamic_type} 으로 사용하는 설정입니다.

[Code Snippet from Elastic]
- analyzer 로 english analyer 를 사용 하겠다는 의미 입니다. {name} == "english"
- {dynamic_type} == long 으로 매칭이 되었고 doc_values 를 사용하지 않겠다는 의미 입니다.

PUT my-index-000001
{
  "mappings": {
    "dynamic_templates": [
      {
        "named_analyzers": {
          "match_mapping_type": "string",
          "match": "*",
          "mapping": {
            "type": "text",
            "analyzer": "{name}"
          }
        }
      },
      {
        "no_doc_values": {
          "match_mapping_type":"*",
          "mapping": {
            "type": "{dynamic_type}",
            "doc_values": false
          }
        }
      }
    ]
  }
}

PUT my-index-000001/_doc/1
{
  "english": "Some English text", 
  "count":   5 
}

지금까지 보셨다면 위 설정은 Index 에 직접 설정 한다는 것을 아실 수 있습니다.

하지만 Elasticsearch 에서는 별도 Index Template 이라는 것을 제공 하고 있습니다.


[참고문서]

www.elastic.co/guide/en/elasticsearch/reference/7.9/index-templates.html

www.elastic.co/guide/en/elasticsearch/reference/7.9/indices-templates-v1.html

www.elastic.co/guide/en/elasticsearch/reference/7.9/indices-component-template.html


이 index template 설정은 최신 버전으로 넘어 오면서 두 가지 타입이 존재 합니다.

- _template 에 설정

PUT /_template/<index-template>


- _component_template 에 설정
PUT /_component_template/<component-template>


이 설정이 dynamic template 과의 차이는 index 에 직접 하느냐 cluster 에 하느냐의 차이 입니다.

더불어 dynamic template 은 mapping 에 대한 내용이지만 index template 은 setting, mapping 등 모두 포함 하고 있습니다.

중요한 내용이니 꼭 인지 하시기 바랍니다.
더불어 주의 하셔야 하는 점은 이런 템플릿 설정은 인덱스가 생성 되는 시점에 적용이 되는 것이기 때문에,

이미 생성된 인덱스에는 영향을 끼치지 못한다는 것도 알아 두셔야 합니다.


[Code Example]

- 아래 template 과 dynamic mapping 을 함께 설정한 예제 입니다.

- 기존 예제만 함쳐 놓은 것이기 때문에 구성에 맞게 고쳐서 사용 하시면 됩니다.

PUT /_template/template_1
{
  "index_patterns" : ["te*"],
  "order" : 0,
  "settings" : {
    "number_of_shards" : 1
  },
  "mappings" : {
    "_source" : { "enabled" : false },
    "dynamic_templates": [
      {
        "integers": {
          "match_mapping_type": "long",
          "mapping": {
            "type": "integer"
          }
        }
      },
      {
        "strings": {
          "match_mapping_type": "string",
          "mapping": {
            "type": "text",
            "fields": {
              "raw": {
                "type":  "keyword",
                "ignore_above": 256
              }
            }
          }
        }
      }
    ]
  }
}


:

[Elasticsearch+Docker] 로컬 클러스터 구성 시 흔한 실수.

Elastic/Elasticsearch 2020. 9. 10. 08:54

Elasticsearch 가 각 노드들과 discovery 를 하기 위해서는 Transport 통신이 이루어져야 합니다.

문서에 정확하게 나와 있으나 놓치기 쉬운 부분이라 기록해 봅니다.


[참고문서]

https://www.elastic.co/guide/en/elasticsearch/reference/current/discovery-settings.html
https://www.elastic.co/guide/en/elasticsearch/reference/current/modules-discovery-bootstrap-cluster.html
https://www.elastic.co/guide/en/elasticsearch/reference/current/modules-discovery-settings.html


[Content Snippet]

[discovery.seed_hosts]

Provides a list of the addresses of the master-eligible nodes in the cluster.

1. transport.profiles.default.port
2. transport.port
If neither of these is set then the default port is 9300.

[Example Configuration]

[Node 1 - docker-compose.yml]
version: '3.7'

services:
  docker-es:
    image: docker.elastic.co/elasticsearch/elasticsearch:7.9.1
    container_name: e1
    environment:
      - cluster.name=e3k1
      - node.name=e1
...중략...
      - discovery.seed_hosts=host.docker.internal:9300,host.docker.internal:9301,host.docker.internal:9302
      - cluster.initial_master_nodes=e1,e2,e3
...중략...

[Node 2 - docker-compose.yml]
version: '3.7'

services:
  docker-es:
    image: docker.elastic.co/elasticsearch/elasticsearch:7.9.1
    container_name: e2
    environment:
      - cluster.name=e3k1
      - node.name=e2
...중략...
      - discovery.seed_hosts=host.docker.internal:9300,host.docker.internal:9301,host.docker.internal:9302
      - cluster.initial_master_nodes=e1,e2,e3
...중략...

[Node 3 - docker-compose.yml]
version: '3.7'

services:
  docker-es:
    image: docker.elastic.co/elasticsearch/elasticsearch:7.9.1
    container_name: e3
    environment:
      - cluster.name=e3k1
      - node.name=e3
...중략...
      - discovery.seed_hosts=host.docker.internal:9300,host.docker.internal:9301,host.docker.internal:9302
      - cluster.initial_master_nodes=e1,e2,e3
...중략...


위에 작성된 설정 예제는 로컬에서 3개의 Elasticsearch 컨테이너를 실행 시켜서 클러스터링 시키는 예제 입니다.

이 방법 말고도 하나의 docker-compose.yml 에 구성을 하셔도 됩니다. (단, 설정이 조금 달라 집니다.)


주의 점은,

위에 언급된 내용처럼 Transport 통신을 한다는 것을 잊으면 안된다는 것입니다.

:

[Elasticsearch] API Key (중복)

Elastic/Elasticsearch 2020. 9. 3. 10:16

이전에 작성한 글과 중복 내용이 있습니다.


이전 글)

jjeong.tistory.com/1487


Elasticsearch + Kibana 사용 시 basic security 설정을 enable 하게 되면 Restful API 사용을 위한 API Key 를 생성 해서 사용을 해야 합니다.


Kibana devtools 를 이용해서 할 경우 인증이 되어 있어서 /_security/api_key 사용이 가능 하지만 Postman 과 같은 걸 이용할 경우 id:pwd 를 넣어 줘야 합니다.

[Case 1]
http://elastic:elasticpassword@localhost:9200/_security/api_key

[Case 2]
curl -XPUT -u elastic:elasticpassword "http://localhost:9200/_security/api_key" -d
{
  "name": "team-index-command",
  "expiration": "10m", 
  "role_descriptors": { 
    "role-team-index-command": {
      "cluster": ["all"],
      "index": [
        {
          "names": ["*"],
          "privileges": ["all"]
        }
      ]
    }
  }
}


API Key 구조)

- /_security/api_key 를 이용해서 생성을 하면 아래와 같은 값이 나옵니다.

[Request]
POST /_security/api_key
{
  "name": "team-index-command",
  "expiration": "10m", 
  "role_descriptors": { 
    "role-team-index-command": {
      "cluster": ["all"],
      "index": [
        {
          "names": ["*"],
          "privileges": ["all"]
        }
      ]
    }
  }
}

[Response]
{
  "id" : "87cuynIBjKAXtnkobGgo",
  "name" : "team-index-command",
  "expiration" : 1592529999478,
  "api_key" : "OlVGT_Q8RGq1C_ASHW7pGg"
}

- API Key 는 id:api_key 조합으로 base64 encoding 된 값입니다.

base64_encode("87cuynIBjKAXtnkobGgo"+":"+"OlVGT_Q8RGq1C_ASHW7pGg")


API Key 를 이용한 Restful API 호출)

$ curl 
  -H "Authorization: ApiKey VGVVOXluSUJHUUdMaHpvcUxDVWo6aUtfSmlEMmdSMy1FUUFpdENCYzF1QQ==" 
  http://localhost:9200/_cluster/health


:

[Elastic] IaC 기반의 Cluster 관리

Elastic 2020. 8. 31. 12:40

Elastic Stack 은 서비스나 데이터를 다루는 모든 기업에서 사용을 하고 있는 매우 훌륭한 오픈소스 입니다.


기본적으로 

  • Elasticsearch
  • Kibana
  • Logstash
  • Beats

이 4가지 Stack 을 이야기 하고 있으며,

잘 활용 하실 경우 현존 하는 많은 상용 도구들을 모두 재낄 수 있습니다.


단, 기술 내재화와 역량을 확보 하겠다는 의지가 있을 경우에 한해서 입니다.


제가 지금까지 다니던 회사는 주로 서비스 회사 였기 때문에,

특정 도메인에 필요로 하는 기능 개발과 스타트업 특성에 따른 빠른 개발을 할 수 밖에 없었습니다.

올해 회사를 옮기면서 그 동안 만나 봤던 분들의 어려움을 해결 할 수 있는 방법은 없을까 하고 고민 하다,

Elastic Stack 에 대한 설치 자동화 프로그램을 만들어 보기로 했습니다.


그 결과로 우선 1차 버전을 이야기 해볼까 합니다.


Elasticsearch 는 누구나 쉽게 사용이 가능 합니다.

검색 (IR) 에 대한 지식이나 전문성이 없어도 Elasticsearch 를 도구적으로 설치 하고 사용 하는 데는 별 문제가 없습니다.

그래서 빠른 PoC 작업을 할 수도 있는 것 같습니다.


하지만 클러스터를 구성 하고 이를 운영 하면서 인프라 관점으로 접근 하다 보면 어려움이 생기게 됩니다.

  • 사용하고자 하는 부서는 많고,
  • 그렇다고 단일 클러스터로 구성해서 사용하라고 제공해 줄 수도 없고,
  • 인프라 생성 요청도 해야 하고,
  • 설정 및 설치도 해야 하고,
  • 문제가 생기면 위 과정을 다시 반복 해야 하고,
  • 클러스터 최적화는 또 어떻게 해야 하고,

등등....


요청자와 생성자의 편의를 제공 할 수 있으면 어떨까 싶었습니다.


제가 만들어 본 Application 은 아래 Stack 을 이용해서 개발이 되었습니다.

  • Spring Framework
  • Terraform
  • Ansible
  • Docker
  • AWS (EC2, S3)
  • Elasticsearch

AWS 기반으로 먼저 개발을 진행을 했고 추후 Azure 나 GCP 로도 확장을 할 예정입니다.


기본 동작 방식은 아래와 같습니다.

1.  Application Container

  - 인프라 구성을 위한 정보를 설정 하고 설치 파일을 생성 합니다.

    - Terraform 관련 파일을 생성 합니다. (setup.tf)

  - 생성 될 인스턴스에 설치 할 정보를 설정하고 설치 파일을 생성 합니다. 

    - Ansible 관련 파일을 생성 합니다. (playbook, inventories, roles)

  - 클러스터 구성을 위한 정보를 설정 하고 설치 파일을 생성 합니다.

    - Docker Compose 관련 파일을 생성 합니다. (docker-compose.yml)

2. Terraform Backend - S3

  - Terraform 을 이용해서 생성한 인스턴스의 정보는 s3 backend 에 저장이 됩니다.

3. Bastion

  - 설치 시 보안 관리를 위해 bastion 서버로 ssh tunneling 하여 설치 합니다.


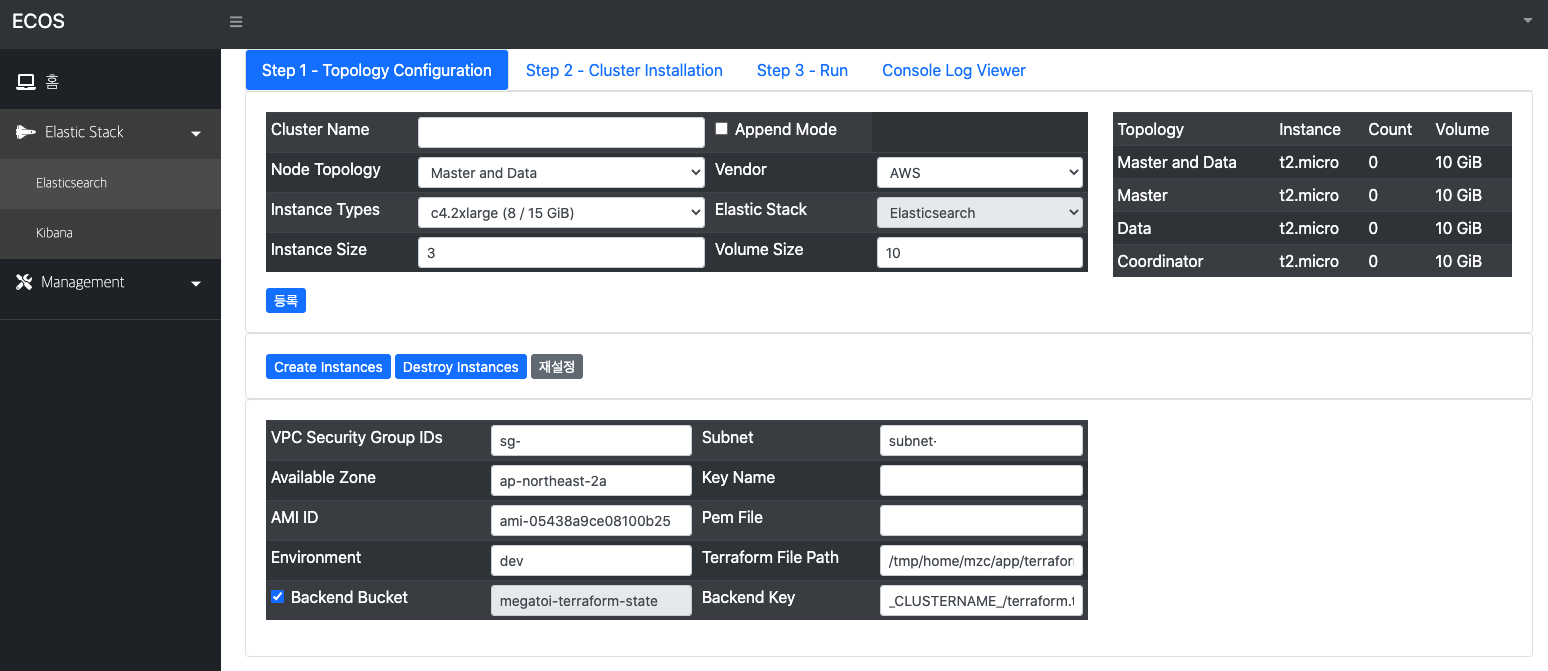
화면 구성은 아래와 같습니다.


그림 1) Terraform 설정 정보와 Elasticsearch Cluster Node Topology 설정 및 실행 화면

그림 2) Ansible 을 이용한 Node 환경 구성 설정 및 실행 화면

그림 3) Elasticsearch Cluster 실행 화면

그림 4) 생성 된 Cluster 에 대한 목록 및 관리 화면

그림 5) 개별 클러스터의 Node 에 대한 관리 화면


만들어진 Application 은 도커 기반으로 개발이 되어 있기 때문에 어떤 환경에서든 실행이 가능 합니다.
가장 기초적인 부분에서 부터 출발한 것으로 

  • 클러스터 구성 및 설치는 어떻게 해야 하는가?
  • 클러스터 구성 시 최적화는 되어 있는가?
  • 클러스터를 쉽게 생성 하고 삭제 할 수 있는가?
  • 이미 생성된 클러스터에 노드 추가는 어떻게 해야 하는가?
  • 개별 노드들에 대한 시작과 중지를 할 수 있는가?

등등...


보시는 바와 같이 클러스터의 생성에서 부터 시작과 중지에 대한 기초 부터 접근을 했습니다.


Elasticsearch 는 크게 3 가지 유형으로 사용을 하게 됩니다.

  • 검색
  • 저장(색인)
  • 분석


위 3 가지 유형을 가지고 Business Domain 별 사용을 하게 되는 것입니다.

  • e-Commerce 상품 검색
  • SIEM
  • Log 및 Data 분석 시스템

등등 ...


이걸 좀 더 고도화 한다고 하면 아래와 같은 서비스들을 쉽게 만들수도 있습니다.

  • AWS Elasticsearch Service
  • Elastic Cloud - Elasticsearch

회사에서 어떤 전략으로 접근 할 지 아직은 잘 모르겠습니다.

이미 IaC 기반으로 잘 제공 되고 있는 MSP (Elastic, AWS) 가 있는데, 우리가 이것 까지 해야 할까?


이 문제는 뒤로 하고,

Elasticsearch 를 사용하거나 사용하고자 하는 스타트업이 있다면,

누구라도 쉽게 최적화된 클러스터를 생성하고 인프라를 관리 할 수 있도록 제공하면 좋겠다는게 지금 저의 생각 입니다.


오픈소스로 공개를 해도 되고, 컨테이너 이미지를 docker registry 에 등록을 해도 되고 몇 가지 방법이 있겠지만,

정말 이런게 필요한지 부터 고민을 더 해봐야 할 것 같습니다.


아무도 필요로 하지 않는데 계속 투자를 해야 할지도 고민이라서요. ^^;


ECOS(Elastic Cloud Open Stack) Installer 의 기능을 간략하게 요약해 드리면,

  1. Elasticsearch Cluster 구성을 위한 GUI 환경을 제공 합니다.
  2. Terraform 기반의 리소스 생성을 제공 합니다.
  3. Ansible 기반의 설치 및 운영 환경을 제공 합니다.
  4. Docker 기반의 Cluster 환경 구성 및 관리 기능을 제공 합니다.
  5. Elasticsearch 설정을 잘 몰라도 됩니다. (이왕이면 알면 좋습니다.)
  6. Cluster 환경을 최적화 해서 구성해 줍니다.
  7. Terraform, Ansible, Docker 등에 대해서 잘 몰라도 됩니다. (이왕이면 알면 좋습니다.)
  8. 리소스를 쉽게 제공하고 회수 할 수 있습니다.
  9. Cluster 내 Node 추가 기능을 제공 합니다.

ECOS Installer 는 우선

  • MZC( Megazone Cloud) 고객사 중
  • 기술 내재화를 고민 하고 계신 고객사

를 찾아서 설치 및 기술 이전을 해보려 합니다.


피드백을 받아 가면서 업그레이드를 해보도록 하겠습니다.


감사합니다.

:

[Elastic] Elastic Agent 테스트.

Elastic 2020. 8. 26. 15:10

[참고문서]

https://www.elastic.co/downloads/elastic-agent

https://www.elastic.co/guide/en/ingest-management/current/index.html


Elastic Agent 를 사용해 보려고 합니다.

최근에 릴리즈 된 Elastic Stack 7.9.0 으로 진행 했습니다.


진행 간에 순서대로 실행한 내용을 그냥 올려 둡니다.

$ bin/elasticsearch -d -p pid
$ bin/elasticsearch-setup-passwords interactive
에러 발생)
{
  "error" : {
    "root_cause" : [
      {
        "type" : "exception",
        "reason" : "Security must be explicitly enabled when using a [basic] license. Enable security by setting [xpack.security.enabled] to [true] in the elasticsearch.yml file and restart the node."
      }
    ],
    "type" : "exception",
    "reason" : "Security must be explicitly enabled when using a [basic] license. Enable security by setting [xpack.security.enabled] to [true] in the elasticsearch.yml file and restart the node."
  },
  "status" : 500
}

xpack security 설정)
$ vi config/elasticsearch.yml
xpack.security.enabled: true
xpack.security.authc.api_key.enabled: true

재실행)
$ bin/elasticsearch-setup-passwords interactive
Initiating the setup of passwords for reserved users elastic,apm_system,kibana,kibana_system,logstash_system,beats_system,remote_monitoring_user.
You will be prompted to enter passwords as the process progresses.
Please confirm that you would like to continue [y/N] y


Enter password for [elastic]: elastic
Reenter password for [elastic]: elastic
Enter password for [apm_system]: elastic
Reenter password for [apm_system]: elastic
Enter password for [kibana_system]: elastic
Reenter password for [kibana_system]: elastic
Enter password for [logstash_system]: elastic
Reenter password for [logstash_system]: elastic
Enter password for [beats_system]: elastic
Reenter password for [beats_system]: elastic
Enter password for [remote_monitoring_user]: elastic
Reenter password for [remote_monitoring_user]: elastic
Changed password for user [apm_system]
Changed password for user [kibana_system]
Changed password for user [kibana]
Changed password for user [logstash_system]
Changed password for user [beats_system]
Changed password for user [remote_monitoring_user]
Changed password for user [elastic]

Kibana 설정)
$ vi config/kibana.yml
46 elasticsearch.username: "kibana_system"
47 elasticsearch.password: "elastic"

$ bin/kibana

Kibana 접속)
http://localhost:5601
  ID/PWD
  elastic/elastic

Kibana IngestManager 접속)
http://localhost:5601/app/ingestManager#/

Agent 사용을 위한 Kibana 추가 설정)
xpack.ingestManager.fleet.tlsCheckDisabled: true
xpack.encryptedSavedObjects.encryptionKey: a123456789012345678901234567890b

이후 단계는 아래 문서 대로 따라 합니다.)
https://www.elastic.co/guide/en/ingest-management/current/ingest-management-getting-started.html
./elastic-agent enroll http://localhost:5601 cEpibEtIUUI2akhoRVR0LWdwZVg6blhHNGdMeURUbVNPQUE0RS1GOFduUQ==
./elastic-agent run

$  ./elastic-agent enroll http://localhost:5601 cEpibEtIUUI2akhoRVR0LWdwZVg6blhHNGdMeURUbVNPQUE0RS1GOFduUQ==
The Elastic Agent is currently in BETA and should not be used in production
This will replace your current settings. Do you want to continue? [Y/n]: y
Error: connection to Kibana is insecure, strongly recommended to use a secure connection (override with --insecure)

$ ./elastic-agent enroll http://localhost:5601 cEpibEtIUUI2akhoRVR0LWdwZVg6blhHNGdMeURUbVNPQUE0RS1GOFduUQ== --insecure
The Elastic Agent is currently in BETA and should not be used in production
This will replace your current settings. Do you want to continue? [Y/n]:y
2020-08-26T14:06:01.782+0900  DEBUG kibana/client.go:170  Request method: POST, path: /api/ingest_manager/fleet/agents/enroll
Successfully enrolled the Agent.

$ ./elastic-agent run

Kibana IngestManager 확인)
http://localhost:5601/app/ingestManager#/

Elasticsearch + Kibana + ElasticAgent + Elastic Common Schema 구성이며, 기존에 beats 를 이용해서 log/data shipper 기능을 구현 하던걸 agent 하나로 대체 할 수 있을 것 같습니다.

더불어서 ECS 기반의 Kibana 에서 Dashboard 와 Visualize 에 대해서도 Preset 을 제공 하니 잘 활용하면 아주 멋질 것으로 기대 합니다.

:

[Ansible] Elasticsearch + Docker Compose 구성 시 vm.max_map_count 이슈.

Cloud&Container/IaC 2020. 8. 14. 14:36

vm.max_map_count 설정은 host 서버에 해주시면 문제는 해결 됩니다.

다만, 이를 수동으로 하면 아무 의미 없겠죠.


자동으로 구성 하기 위해서 terraform + ansible 사용 하는 건데 수동으로 할 거면 ....


처음에는 init.sh 라는 스크립트 안에서 처리 하도록 했습니다.

- name: Run a script with arguments
  script: init.sh

init.sh 에는 아래 코드가 들어가 있습니다.

sudo sysctl -w vm.max_map_count=262144


이렇게 했으면 당연히 elasticsearch 를 실행 시켰을 때 문제가 없을 줄 알았는데, 적용이 안되었는지 오류가 발생했습니다.

그래서 ansible 에 명령어를 추가 해서 문제를 해결했습니다.

- name: set vm.max_map_count
  shell: sudo sysctl -w vm.max_map_count=262144


$ ansible-playbook 해 보면 아래와 같은 warning 메시지가 나오는데요.

Consider using 'become', 'become_method', and 'become_user' rather than running sudo


- name: become parameters
  become: yes
  become_method: sudo
  become_user: ubuntu 

이렇게 넣어서 사용하라는 이야기 입니다.


[수정]

- name: set vm.max_map_count
  become: yes
  become_method: sudo
  shell: sysctl -w vm.max_map_count=262144
:

[Elasticsearch] X-pack Security API Key 사용 해 보기

Elastic/Elasticsearch 2020. 6. 19. 11:07

Elastic Stack 이 좋은 이유는 기본 Basic license 까지 사용이 가능 하다는 것입니다.

사실 이것 말고도 엄청 많죠 ㅎㅎ 


https://www.elastic.co/subscriptions


딱 API keys management 까지 사용이 됩니다. ㅎㅎㅎ


먼저 사용하기에 앞서서 Elasticsearch 와 Kibana 에 x-pack 사용을 위한 설정을 하셔야 합니다.


[Elasticsearch]

- elasticsearch.yml

xpack.monitoring.enabled: true
xpack.ml.enabled: true
xpack.security.enabled: true

xpack.security.authc.api_key.enabled: true
xpack.security.authc.api_key.hashing.algorithm: "pbkdf2"
xpack.security.authc.api_key.cache.ttl: "1d"
xpack.security.authc.api_key.cache.max_keys: 10000
xpack.security.authc.api_key.cache.hash_algo: "ssha256"

위 설정은 기본이기 때문에 환경에 맞게 최적화 하셔야 합니다.

https://www.elastic.co/guide/en/elasticsearch/reference/7.8/security-settings.html#api-key-service-settings


[Kibana]

- kibana.yml

xpack:
  security:
    enabled: true
    encryptionKey: "9c42bff2e04f9b937966bda03e6b5828"
    session:
      idleTimeout: 600000
    audit:
      enabled: true


이렇게 설정 한 후 id/password 설정을 하시면 됩니다.


# bin/elasticsearch-setup-passwords interactive
Initiating the setup of passwords for reserved users elastic,apm_system,kibana,logstash_system,beats_system,remote_monitoring_user.
You will be prompted to enter passwords as the process progresses.
Please confirm that you would like to continue [y/N]y

Enter password for [elastic]:
Reenter password for [elastic]:
Enter password for [apm_system]:
Reenter password for [apm_system]:
Enter password for [kibana]:
Reenter password for [kibana]:
Enter password for [logstash_system]:
Reenter password for [logstash_system]:
Enter password for [beats_system]:
Reenter password for [beats_system]:
Enter password for [remote_monitoring_user]:
Reenter password for [remote_monitoring_user]:
Changed password for user [apm_system]
Changed password for user [kibana]
Changed password for user [logstash_system]
Changed password for user [beats_system]

Changed password for user [remote_monitoring_user]
Changed password for user [elastic]


이렇게 설정이 끝나면 kibana 에 접속해서 API key 를 생성 하시면 됩니다.

아래 문서는 생성 시 도움이 되는 문서 입니다.


www.elastic.co/guide/en/elasticsearch/reference/current/security-privileges.html

www.elastic.co/guide/en/elasticsearch/reference/7.7/security-api-put-role.htmlwww.elastic.co/guide/en/elasticsearch/reference/7.7/defining-roles.htmlwww.elastic.co/guide/en/elasticsearch/reference/7.7/security-api-create-api-key.html


Kibana Console 에서 아래와 같이 생성이 가능 합니다.

POST /_security/api_key
{
  "name": "team-index-command",
  "expiration": "10m", 
  "role_descriptors": { 
    "role-team-index-command": {
      "cluster": ["all"],
      "index": [
        {
          "names": ["*"],
          "privileges": ["all"]
        }
      ]
    }
  }
}

{
  "id" : "87cuynIBjKAXtnkobGgo",
  "name" : "team-index-command",
  "expiration" : 1592529999478,
  "api_key" : "OlVGT_Q8RGq1C_ASHW7pGg"
}

생성 이후 사용을 위해서는 


- ApiKey 는 id:api_key 를 base64 인코딩 합니다.

base64_encode("87cuynIBjKAXtnkobGgo"+":"+"OlVGT_Q8RGq1C_ASHW7pGg")
==> VGVVOXluSUJHUUdMaHpvcUxDVWo6aUtfSmlEMmdSMy1FUUFpdENCYzF1QQ==
curl -H 
  "Authorization: ApiKey VGVVOXluSUJHUUdMaHpvcUxDVWo6aUtfSmlEMmdSMy1FUUFpdENCYzF1QQ==" 
  http://localhost:9200/_cluster/health

이제 용도와 목적에 맞춰서 API key 를 만들고 사용 하시면 되겠습니다.


:

[Elasticsearch] script 사용 시 "#! Deprecation: Deprecated field [inline] used, expected [source] instead"

Elastic/Elasticsearch 2020. 6. 17. 08:20

에러 메시지를 보면 답이 나와 있습니다.

inline 대신 source 를 사용 하라는 이야기 입니다.


[ASIS]

  "aggs": {
    "3": {
      "date_histogram": {
        "field": "@timestamp",
        "fixed_interval": "30s",
        "time_zone": "Asia/Seoul",
        "min_doc_count": 1
      },
      "aggs": {
        "1": {
          "max": {
            "field": "system.cpu.total.pct",
            "script": {
              "inline": "doc['system.cpu.total.pct'].value *100",
              "lang": "painless"
            }
          }
        }
      }
    }
  }


[TOBE]

  "aggs": {
    "3": {
      "date_histogram": {
        "field": "@timestamp",
        "fixed_interval": "30s",
        "time_zone": "Asia/Seoul",
        "min_doc_count": 1
      },
      "aggs": {
        "1": {
          "max": {
            "field": "system.cpu.total.pct",
            "script": {
              "source": "doc['system.cpu.total.pct'].value *100",
              "lang": "painless"
            }
          }
        }
      }
    }
  }

이상 끝.

:

[Filebeat] template 설정 setup.template.append_fields

Elastic/Beats 2020. 6. 3. 14:15

참고 문서)

https://www.elastic.co/guide/en/beats/filebeat/current/configuration-template.html


설정 중에 필요한 내용이 있어서 기록해 봅니다.


setup.template.append_fields


A list of fields to be added to the template and Kibana index pattern.

This setting adds new fields. It does not overwrite or change existing fields.

This setting is useful when your data contains fields that Filebeat doesn’t know about in advance.

If append_fields is specified along with overwrite: true,

Filebeat overwrites the existing template and applies the new template when creating new indices.

Existing indices are not affected.

If you’re running multiple instances of Filebeat with different append_fields settings,

the last one writing the template takes precedence.

Any changes to this setting also affect the Kibana index pattern.


Example config:

setup.template.overwrite: true

setup.template.append_fields:

  - name: test.name

     type: keyword

  - name: test.hostname

     type: long


이 설정으로 dynamic mapping 이나 template 관련 번거로움을 간단하게 해결 할 수 있습니다.

저는 몇 개 field 에 대해서 date 로 설정을 해야 해서 이 설정을 사용했습니다.


:

[Elasticsearch]7.x breaking changes.

Elastic/Elasticsearch 2020. 5. 27. 14:05

다 알아야 하겠지만 이 정도는 알고 넘어 가면 좋을 것 같아 뽑아 봤습니다.


참고문서)

https://www.elastic.co/guide/en/elasticsearch/reference/7.7/breaking-changes-7.0.html


thread_pool.listener.size and thread_pool.listener.queue_size have been deprecated
cluster.remote.connect is deprecated in favor of node.remote_cluster_client
auth.password deprecated, auth.secure_password setting instead.
Deprecation of sparse vector fields
The vector functions of the form function(query, doc['field']) are deprecated, and the form function(query, 'field') should be used instead. 
The nGram and edgeNGram tokenizer names haven been deprecated with 7.6. 
	-> The tokenizer name should be changed to the fully equivalent ngram or edge_ngram names for new indices and in index templates.
Starting in version 7.4, a + in a URL will be encoded as %2B by all REST API functionality.
	-> es.rest.url_plus_as_space to true
After starting each shard the elected master node must perform a reroute to search for other shards that could be allocated. (>7.4)
Auto-release of read-only-allow-delete block
	-> es.disk.auto_release_flood_stage_block: true
pidfile setting is being replaced by node.pidfile
processors setting is being replaced by node.processors
The common query has been deprecated.
	-> match query
Only a single port may be given for each seed host.
	-> "10.11.12.13:9300-9310" then Elasticsearch would only use 10.11.12.13:9300 for discovery.
The http.tcp_no_delay setting is deprecated in 7.1. It is replaced by http.tcp.no_delay.
The network.tcp.connect_timeout setting is deprecated in 7.1
	-> transport.connect_timeout.
transport.tcp.port is replaced by transport.port
transport.tcp.compress is replaced by transport.compress
transport.tcp.connect_timeout is replaced by transport.connect_timeout
transport.tcp_no_delay is replaced by transport.tcp.no_delay
transport.profiles.profile_name.tcp_no_delay is replaced by transport.profiles.profile_name.tcp.no_delay
transport.profiles.profile_name.tcp_keep_alive is replaced by transport.profiles.profile_name.tcp.keep_alive
transport.profiles.profile_name.reuse_address is replaced by transport.profiles.profile_name.tcp.reuse_address
transport.profiles.profile_name.send_buffer_size is replaced by transport.profiles.profile_name.tcp.send_buffer_size
transport.profiles.profile_name.receive_buffer_size is replaced by transport.profiles.profile_name.tcp.receive_buffer_size
delimited_payload_filter renaming
	-> delimited_payload
The standard token filter has been removed
The standard_html_strip analyzer has been deprecated,
	-> combination of the standard tokenizer and html_strip char_filter
Shard preferences _primary, _primary_first, _replica, and _replica_first are removed
indices.breaker.fielddata.limit has been lowered from 60% to 40% of the JVM heap size.
The index_options field for numeric fields has been deprecated in 6 and has now been removed.
The classic similarity has been removed.
Adaptive replica selection has been enabled by default.
Semantics changed for max_concurrent_shard_requests
	->  In 7.0 this changed to be the max number of concurrent shard requests per node. The default is now 5
Negative boosts are not allowed
The filter context has been removed from Elasticsearch’s query builders, the distinction between queries and filters is now decided in Lucene depending on whether queries need to access score or not.
Tribe node functionality has been removed in favor of Cross Cluster Search.
Camel case and underscore parameters deprecated in 6.x have been removed
The default for node.name is now the hostname
The setting node.store.allow_mmapfs has been renamed to node.store.allow_mmap.
The setting http.enabled previously allowed disabling binding to HTTP, only allowing use of the transport client. This setting has been removed, as the transport client will be removed in the future, thus requiring HTTP to always be enabled.
: