[Elastic] Elasticsearch Cluster 구성하기 based on IaC
Elastic 2021. 2. 2. 12:04https://github.com/HowookJeong/ecos-installer-web
배포 및 실행 가이드
Prerequisite)
- bastion machine 은 ubuntu 를 사용 합니다.
- bastion 및 ec2 instance 에 ssh tunnuling 을 위한 key pairs 생성을 합니다.
- 로컬 장비에서 실행 하기 위해 계정의 access/secret key 생성을 합니다.
Step 1) Local 실행 환경 구성
$ aws configure --profile ecos
Put region : ap-northeast-2
Put output : json
Put access key : xxxxxxxxxxxxxx
Put secret key : xxxxxxxxxxxxxx
Put key pairs file to ~/.ssh/
Step 2) Terraform & Ansible 환경 설정
$ vi docker-compose.yml
 environment:
 ...중략...
   - serverPort=${SERVER_PORT}
   - configWorkingPath=/tmp/home/mzc/app
   - configTerraformAwsBastionIp=${BASTION_IP}
   - configTerraformAwsSecurityGroup=sg-xxxxxxxxxxxxxxxx
   - configTerraformAwsAz=ap-northeast-2a
   - configTerraformAwsAmi=ami-061b0ee20654981ab
   - configTerraformAwsSubnet=subnet-xxxxxxxxxxxxxxxx
   - configTerraformAwsKeyName=ec2key-gw
   - configTerraformAwsPemFile=ec2key-gw.pem
   - configTerraformAwsPathElasticsearch=/tmp/home/mzc/app/terraform/_CLUSTERNAME_
   - configTerraformAwsPathKibana=/tmp/home/mzc/app/terraform/_CLUSTERNAME_/kibana
   - configTerraformAwsBackendBucket=megatoi-terraform-state
   - configTerraformAwsBackendKeyElasticsearch=_CLUSTERNAME_/terraform.tfstate
   - configTerraformAwsBackendKeyKibana=_CLUSTERNAME_/kibana/terraform.tfstate
 volumes:
 ...중략...
   - /Users/계정/.aws:/root/.aws
   - /Users/계정/.ssh:/root/.ssh
Step 3) 배포 된 docker image load
$ sudo docker load -i ecos-installer-web-0.0.1.tar
Step 4) 컨테이너 실행/중지
$ ENV=dev TAG=0.0.1 REDIRECT_HTTPS=true SERVER_PORT=8081 docker-compose up -d
$ ENV=dev TAG=0.0.1 REDIRECT_HTTPS=true SERVER_PORT=8081 docker-compose down
Local 개발 환경
- $ cd .aws
- $ aws configure --profile ecos
- $ vi config
[profile ecos]
region = ap-northeast-2
output = json
- $ vi credentials
[ecos]
aws_access_key_id = xxxxxxxxxxxxxxxxx
aws_secret_access_key = xxxxxxxxxxxxxxxxxx
Project Docker Compose 설정
...중략...
    volumes:
      - /Users/mzc02-henryjeong/.aws:/root/.aws
      - /Users/mzc02-henryjeong/.ssh:/root/.ssh
      - /Users/mzc02-henryjeong/Temp/logs:/home/mzc/logs
      - /var/run/docker.sock:/var/run/docker.sock
      - /Users/mzc02-henryjeong/Works/app/terraform:/home/mzc/backup/terraform
...중략...- aws 접속 및 ssh 터널링을 위해 관련 path 에 대한 mount 를 합니다.
Build Step
- $ ./gradlew clean build bootJar -Pprofile=dev -x test
- $ docker build --build-arg BASTION_IP=xxx.xxx.xxx.xxx --tag ecos-installer-web:0.0.1 .
- OR $ ENV=dev TAG=0.0.1 REDIRECT_HTTPS=true SERVER_PORT=8081 docker-compose build
- $ ENV=dev TAG=0.0.1 REDIRECT_HTTPS=true SERVER_PORT=8081 docker-compose up
- $ ENV=dev TAG=0.0.1 REDIRECT_HTTPS=true SERVER_PORT=8081 docker-compose down
- $ docker image ls
- $ docker rmi -f 7f52709a6615
- $ docker exec -it ecos-installer-web /bin/sh
- $ sudo docker save -o ecos-installer-web-0.0.1.tar ecos-installer-web:0.0.1
- $ sudo docker load -i ecos-installer-web-0.0.1.tar
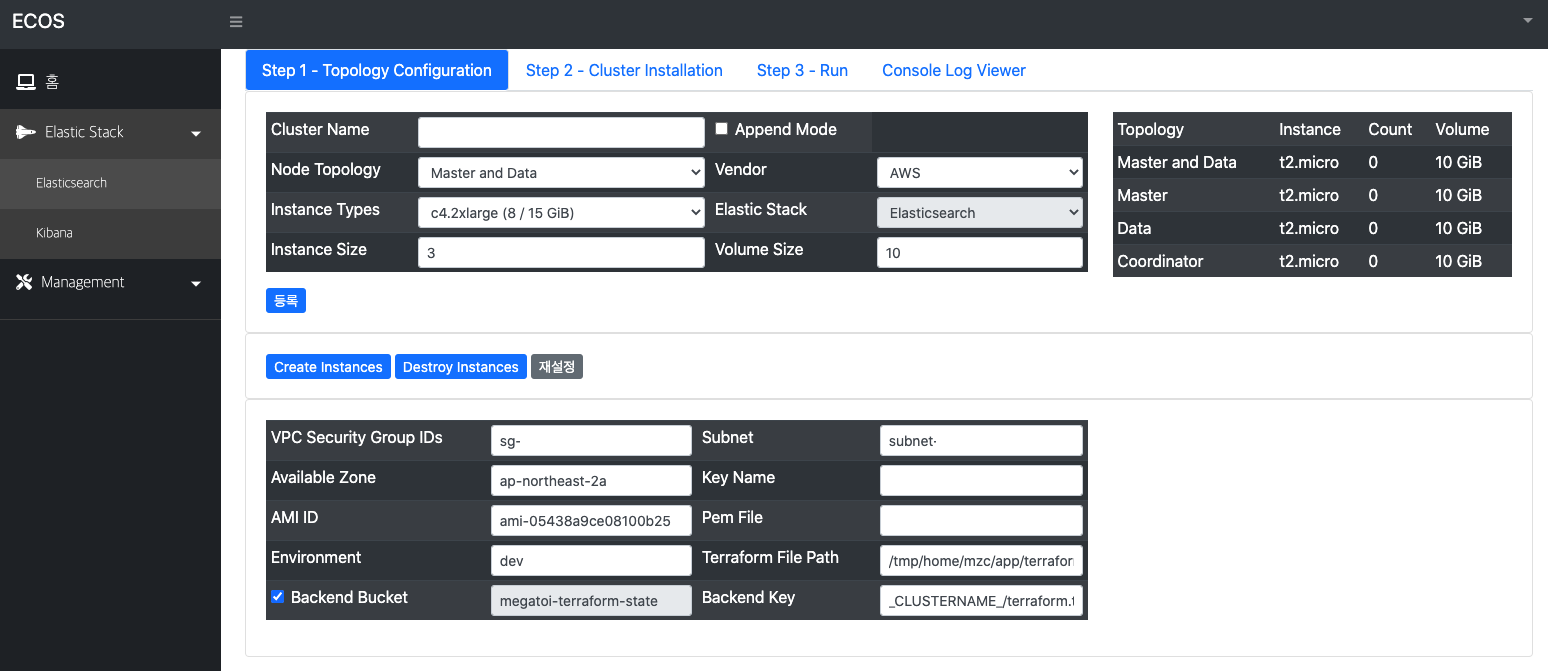
Terraform path 와 Elasticsearch Cluster 명명 규칙
- Terraform File Path : /tmp/home/mzc/app/terraform/${CLUSTERNAME}/${TIMESTAMP}
- Backend Key : ${CLUSTERNAME}/${TIMESTAMP}/terraform.tfstate
- 신규 생성 시
- Step 1) Terraform File Path : /tmp/home/mzc/app/terraform/elasticsearch
- Step 1) Backend Key : elasticsearch/terraform.tfstate
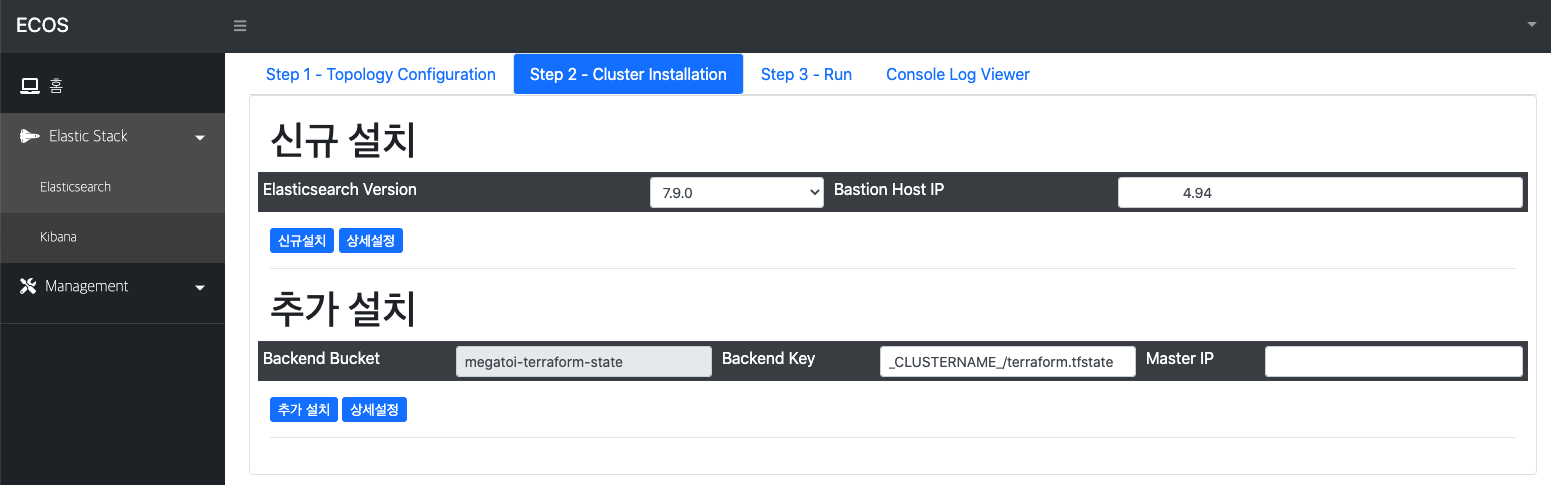
- 추가 시
- Step 1) Terraform File Path : /tmp/home/mzc/app/terraform/elasticsearch/1598860075233
- Step 1) Backend Key : elasticsearch/1598860075233/terraform.tfstate
- Step 2) Backend Key : elasticsearch/1598860075233/terraform.tfstate
- 기존 클러스터에 Join 시키기 위해 master ip 정보를 구해야 함
생성 및 설정
- aws account access/secret key 생성
- aws configure 설정
- bastion 서버 생성
- vpc 내 정보 설정
- security group
- subnet
- az
- ec2 네트워크 및 보안에서 키 페어 생성 및 등록 (keyName, keyPem)
- ami
- terraform 정보 설정
- terraform working path 설정
- terraform backend 설정
- aws cluster instance 설정
- node topology 설정 (node 유형)
- instance type 설정 (cpu, mem, network 성능)
- instance size 설정 (node 규모)
- disk volume size 설정 (elasticsearch storage)
- elasticsearch cluster 설정
- cluster name 설정
- 설치를 위한 elasticsearch version 지정
- port 설정 (http, tcp)
- path.data/logs 설정
- ansible 설정
- working path 설정
- bastion ip 설정
Service Flow
-
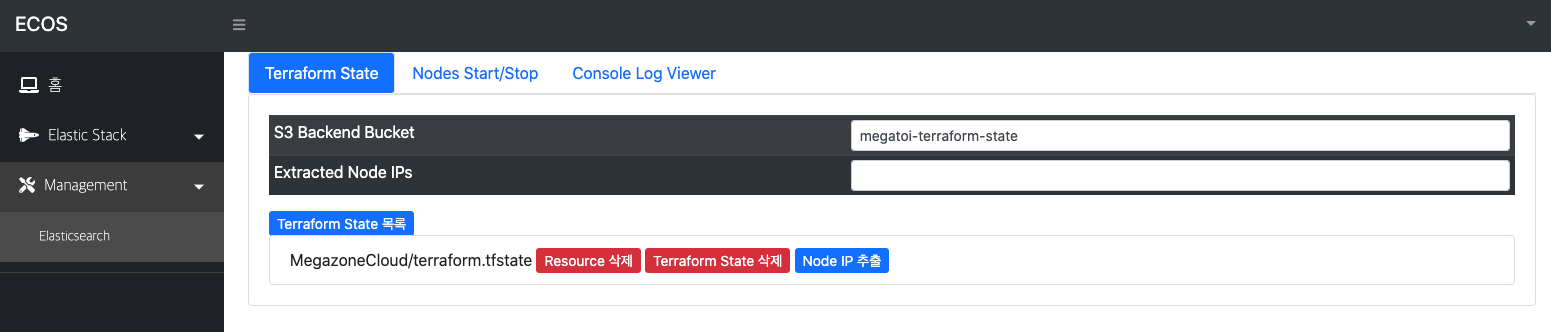
TerraformService
- terraform
- createTerraformS3Backend
- readTerraformTemplateForElasticsearch
- writeTerraformTemplateForElasticsearch
- runTerraformTemplateForElasticsearch
- backupTerraformTemplateStateForElasticsearch (if it is not s3 backend)
- terraform
-
ElasticsearchService
- docker
- createDockerComposeConfiguration
- ansible
- createAnsibleInventories
- createAnsibleRoles
- docker
runAnsiblePlaybook